(First edition) |
m (fix lin) |
||
| (18 intermediate revisions by 5 users not shown) | |||
| Line 1: | Line 1: | ||
[[Image: | {{Header Nav|game=Counter-Strike: Source}} | ||
{{Counter-Strike: Source/Map| | |||
|title=de_inferno | |||
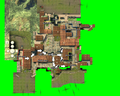
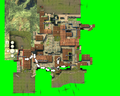
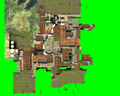
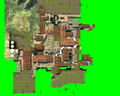
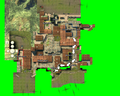
|overview=[[Image:css de inferno overview general.png|200px]] | |||
|developer=[[Turtle Rock Studios]] | |||
|players=0-32 | |||
|type=[[Counter-Strike: Source/Walkthrough#Bomb defusion|Bomb defusion]] | |||
|popularity=Low | |||
|tactics={{s|Strategies|Rushing}} | |||
}} | |||
'''de_inferno''' is a bomb-defusion map based in a small Mediterranean village. The terrorists have to plant the bomb and protect it until it explodes, and the counter-terrorists have to stop the bomb being planted/exploding. | |||
=== | ==Map strategies== | ||
===Terrorists=== | |||
[[Image:css de inferno a.jpg|thumb|right|Bomb site A.]] | |||
The terrorists start at the bottom of the map (it's on a slight gradient). They have four routes of attack: along the ''stairs'', down the ''middle'', through the ''buildings'', and through up the road on the right. | |||
Going along the ''stairs'' ([[#t rush stairs|overview 1]]) is a safe bet if the counter-terrorists aren't going that way (many counter-terrorists never go that way), and will lead straight to bomb site A. However, if the counter-terrorists are rushing there, it is better to take a different route, since they have the advantage of higher ground and better cover. | |||
Going up the ''middle'' ([[#t rush middle|overview 2]]) is quite unsafe, as you're open to attack from counter-terrorists who've successfully rushed the ''stairs'', and three other possible entrance points for the counter-terrorists. However, stationing a sniper in the ''flats'' at the bottom of the ''main road'' is a good idea, since he will command the ''middle'', and will be quite hard to kill. | |||
Going through the ''buildings'' ([[#t rush buildings|overview 3]]) is a decent choice to make, giving the advantage of height over those in the road on the right, and a clear path to the buildings overlooking bomb site B. However, counter-terrorists wielding flashbangs and grenades can repel an assault in this area, and are somewhat hard to repel. If given the opportunity, a good confusion maneuver is to move from the right over to the ''middle'', especially if the counter-terrorists occupy the building overlooking bomb site B. | |||
[[Image: | Going up the road on the right is a similar choice to going through the ''buildings'' ([[#t rush buildings|overview 3]]), and has the same result, with both groups meeting up, and having the option of entering the buildings overlooking bomb site B or moving to help out in the ''middle''. | ||
The counter-terrorists start at the top of the map, close to both | |||
Going down the | If given the choice, bomb site A is a better place to plant than bomb site B, as it has only one route of assault, while bomb site B is surrounded by entrances and sniper points. Bomb site A provides plenty of cover to defending terrorists, while bomb site B doesn't. | ||
Going down the left gives the option of | |||
<gallery> | |||
Image:Css_de_inferno_overview_t_rush_stairs.png|<span id="t_rush_stairs">Terrorists rushing the stairs.</span> | |||
Image:Css_de_inferno_overview_t_rush_middle.png|<span id="t_rush_middle">Terrorists rushing the middle.</span> | |||
Image:Css_de_inferno_overview_t_rush_buildings.png|<span id="t_rush_buildings">Terrorists rushing the buildings.</span> | |||
</gallery> | |||
===Counter-terrorists=== | |||
[[Image:css de inferno b.jpg|thumb|right|Bomb site B.]] | |||
The counter-terrorists start at the top of the map, close to both bomb sites. There are two main routes you can take: to the left, or down the ''stairs''. | |||
Going down the ''stairs'' ([[#ct rush stairs|overview 1]]) is an option few players take, and if there are terrorists down there, you'll need backup. However, there's plenty of cover, and a flashbang and grenade will dispatch most terrorists down there. Once through, you are free to check the ''terrorist spawn'' or take any of the terrorists' routes, coming up behind them. Many counter-terrorists simply go up the ''middle'' once they've broken through, however. | |||
Going down the left gives the option of traveling through the ''buildings'' ([[#ct rush buildings|overview 3]]) overlooking bomb site B, or going down the ''middle'' ([[#ct rush middle|overview 2]]). Either option will probably result in resistance, but the ''buildings'' provide more cover, and you can bounce flashbangs around corners to blind the terrorists. Going into the ''buildings'' also gives the advantage of a sniper point over the road parallel with the ''buildings'', and a sniper point over bomb site B. However, going down the ''middle'' gives options as to going up the ''stairs'' once you're at the bottom of the ''middle'', to come up behind the terrorists at bomb site A; terrorists will most likely plant the bomb at site A. You can also snipe down adventurous terrorists coming up the middle by staying crouched at the T-junction at the top. | |||
<gallery> | |||
Image:Css_de_inferno_overview_ct_rush_stairs.png|<span id="ct_rush_stairs">Counter-terrorists rushing the stairs.</span> | |||
Image:Css_de_inferno_overview_ct_rush_middle.png|<span id="ct_rush_middle">Counter-terrorists rushing the middle.</span> | |||
Image:Css_de_inferno_overview_ct_rush_buildings.png|<span id="ct_rush_buildings">Counter-terrorists rushing the buildings.</span> | |||
</gallery> | |||
==Panoramic screenshots== | |||
<gallery> | |||
Image:css_de_inferno_a.mov|Bomb site A. | |||
Image:css_de_inferno_b.mov|Bomb site B. | |||
</gallery> | |||
Latest revision as of 16:45, 28 May 2021
| de_inferno | |
|---|---|

| |
| Developer | Turtle Rock Studios |
| Players | 0-32 |
| Type | Bomb defusion |
| Popularity | Low |
| General tactics | Rushing |
de_inferno is a bomb-defusion map based in a small Mediterranean village. The terrorists have to plant the bomb and protect it until it explodes, and the counter-terrorists have to stop the bomb being planted/exploding.
Map strategies[edit | edit source]
Terrorists[edit | edit source]

The terrorists start at the bottom of the map (it's on a slight gradient). They have four routes of attack: along the stairs, down the middle, through the buildings, and through up the road on the right.
Going along the stairs (overview 1) is a safe bet if the counter-terrorists aren't going that way (many counter-terrorists never go that way), and will lead straight to bomb site A. However, if the counter-terrorists are rushing there, it is better to take a different route, since they have the advantage of higher ground and better cover.
Going up the middle (overview 2) is quite unsafe, as you're open to attack from counter-terrorists who've successfully rushed the stairs, and three other possible entrance points for the counter-terrorists. However, stationing a sniper in the flats at the bottom of the main road is a good idea, since he will command the middle, and will be quite hard to kill.
Going through the buildings (overview 3) is a decent choice to make, giving the advantage of height over those in the road on the right, and a clear path to the buildings overlooking bomb site B. However, counter-terrorists wielding flashbangs and grenades can repel an assault in this area, and are somewhat hard to repel. If given the opportunity, a good confusion maneuver is to move from the right over to the middle, especially if the counter-terrorists occupy the building overlooking bomb site B.
Going up the road on the right is a similar choice to going through the buildings (overview 3), and has the same result, with both groups meeting up, and having the option of entering the buildings overlooking bomb site B or moving to help out in the middle.
If given the choice, bomb site A is a better place to plant than bomb site B, as it has only one route of assault, while bomb site B is surrounded by entrances and sniper points. Bomb site A provides plenty of cover to defending terrorists, while bomb site B doesn't.
-

Terrorists rushing the stairs.
-
Terrorists rushing the middle.
-
Terrorists rushing the buildings.


Counter-terrorists[edit | edit source]

The counter-terrorists start at the top of the map, close to both bomb sites. There are two main routes you can take: to the left, or down the stairs.
Going down the stairs (overview 1) is an option few players take, and if there are terrorists down there, you'll need backup. However, there's plenty of cover, and a flashbang and grenade will dispatch most terrorists down there. Once through, you are free to check the terrorist spawn or take any of the terrorists' routes, coming up behind them. Many counter-terrorists simply go up the middle once they've broken through, however.
Going down the left gives the option of traveling through the buildings (overview 3) overlooking bomb site B, or going down the middle (overview 2). Either option will probably result in resistance, but the buildings provide more cover, and you can bounce flashbangs around corners to blind the terrorists. Going into the buildings also gives the advantage of a sniper point over the road parallel with the buildings, and a sniper point over bomb site B. However, going down the middle gives options as to going up the stairs once you're at the bottom of the middle, to come up behind the terrorists at bomb site A; terrorists will most likely plant the bomb at site A. You can also snipe down adventurous terrorists coming up the middle by staying crouched at the T-junction at the top.
-
Counter-terrorists rushing the stairs.
-
Counter-terrorists rushing the middle.
-
Counter-terrorists rushing the buildings.


Panoramic screenshots[edit | edit source]
-
Bomb site A.
-
Bomb site B.