(Added Strategy and Walkthrough sections.) |
(Filled in "Strategy" section.) |
||
| Line 14: | Line 14: | ||
== Strategy == | == Strategy == | ||
Taking into account the [[../Weapons/]] that you have at this point, this may be the hardest level of the game for new players. Even if your preferred strategy is to charge in with guns blazing, consider holding back in this level to preserve health and armor. You'll very likely lose all the armour you bring in from the previous level and there are only a scattering of Armor Shards to replace it. There is enough health around if you are careful, but not enough for you to be foolhardy. Save the game often. When entering new areas, look all around quickly and pull back to take stock. You will meet new Strogg types, the Gunner, who is tough to kill and throws a rain of Grenades at you, and the Parasite. On the plus side, there is adequate ammunition, particularly for the Machine Gun. One last word ... watch out for a booby trap. | |||
== Walkthrough == | == Walkthrough == | ||
Revision as of 12:53, 9 February 2016
| Map Name | Initial Coordinates |
|---|---|
| base3 | (1688 1412 -785) : -180° (facing south) |
Level objective
According to your field computer, the objective of this level is to locate the communication center. That turns out to be a room in this level. In that room you will be able to accomplish the objective of the unit, which is to establish a communication link to the command ship. Since you can't climb up the sewer pipe to go back to the Installation, expect to have to find another way out.
Strategy
Taking into account the Weapons that you have at this point, this may be the hardest level of the game for new players. Even if your preferred strategy is to charge in with guns blazing, consider holding back in this level to preserve health and armor. You'll very likely lose all the armour you bring in from the previous level and there are only a scattering of Armor Shards to replace it. There is enough health around if you are careful, but not enough for you to be foolhardy. Save the game often. When entering new areas, look all around quickly and pull back to take stock. You will meet new Strogg types, the Gunner, who is tough to kill and throws a rain of Grenades at you, and the Parasite. On the plus side, there is adequate ammunition, particularly for the Machine Gun. One last word ... watch out for a booby trap.
Walkthrough
Leave the sewer pipe through which you came from the Installation. You'll be standing on a grid over deep water. If you look between the bars, you'll see a dead Marine. Maybe he has dropped something useful nearby that you should swim down and collect. So that you aren't subjected to a surprise attack while doing this, you'd do well to check through the doorway first. The next room contains an Enforcer, three Light Guards and more water. The steps going down seem like an invitation to explore and you will find two holes down there that both let you go deeper, under a submerged floor (see Secrets, below, if this isn't a big enough hint).
Parasites
The door from the second room leads to a new enemy, a Parasite, which will appear from the darkened ramp in the floor. Hit the Parasite with sustained machine gun fire and keep it at a distance so it can't reach you with its deadly probe. To continue, climb up the stairs. To get the Quad Damage, jump up onto the explosive radioactive container closest to the crate and jump up onto the crate. If the containers are already destroyed, execute a running jump from the nearest stack of crates.
Go up the ramp and down the hallway to the left. Proceed through the doorway, turn left, ignoring the empty cylindrical tank for now, and go to the courtyard outside. Turn left, but be careful not to enter the room immediately: The boxes with black and yellow diagonal stripes are explosives that can kill you, and they will detonate when an Enforcer presses the alarm button in the corner of the room. After you kill the Enforcer, take the elevator up and proceed along the catwalk to the communications room.
Defeat the enemy guards in the Comm Center to disable the laser beam barrier, and activate the communications station to get the Blue Key.
Returning to the Installation
If desired, you can run-jump from the mezzanine walkway to get the Environment Suit (~ "Enviro-Suit") on top of the stack of crates, and then jump onto the catwalk at the bottom of the cylindrical tank. An Adrenaline vial, found in the room at the bottom will restore health. Activate the Enviro-Suit just before you press the green button at the opposite end of the catwalk. The tank fills to the brim with corrosive green slime; swim up and step out of the tank.
Head back outside across the courtyard and through the locked door, now opened by the Blue Key.
Secrets
This level has two (2) secrets, although it's hard to see how you could find the first and fail to find the second:
- In the second room that you come to after starting the level, start down the steps into the water, then turn to the right and dive down through the small, jagged hole in the floor of the water pool. Swim in the direction away from the steps through some underwater tunnels and come up in a dim, ruined room to receive the message "You have found a secret area". Although there is a Rebreather in the second room, which you should take on your return, there is no need to use it now if you don't dally underwater. There is nothing but rubble in the room that you come up into, but if you step through the hole in the wall you will find some dead Marines, a MedKit and some ammunition for the Machine Gun. Retrace your steps to return and continue the level.
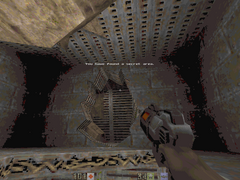
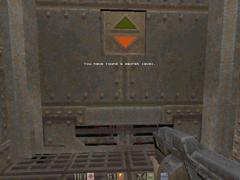
- If you found the first secret, you probably noticed the elevator near the dead Marines. Go in and push the button to receive the message "You have found a secret level". The elevator will take you to the Lost Station. Play through and return the way you came to continue the Comm Center level.
- Gallery : Finding the secrets in the Comm Center Level
-
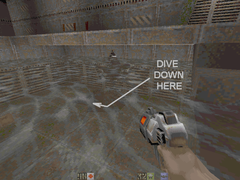
Swim down through this hole, not the larger one.
-
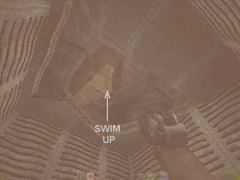
Follow the underwater tunnels and swim up.
-
There's nothing in the secret area but a broken wall.
-
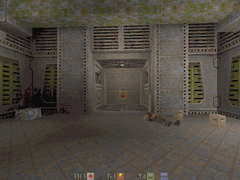
Through the hole there's a room with an elevator.
-
The elevator takes you to a secret level.


